All Posts
I've Noticed AI Tools Generate Terrible REST APIs - Here's How to Fix It
Here’s something that bugs me: AI tools like ChatGPT, Claude, Gemini, or whatever AI you’re using are great at cranking out code fast, but they often generate REST APIs that look like they were designed by someone who never had to maintain them.
Arch Linux for Developers: A Step-by-Step Guide to Building Your Ultimate Dev Environment

GrooveCraft: Building Your Own Amplifier for Next-Level Music Vibes
People have different preferences when it comes to how they like to listen to music, and the sound experience can be different for each person. Here, I’ve put together my findings on creating an affordable do-it-yourself sound system that suits my taste.
Saga Pattern with serverless model on Google Cloud Platform - Part 1
Gostep: 👉 Guide
Materials: 👉 Complete source code
During the past few years, the microservices architecture(MSA) and serverless model have gained a lot of popularity in the industry. However, these technologies come with their own set of challenges. One substantial challenge is managing data in MSA due to its complexity. Considering common patterns for MSA data management we will be focusing on the Saga pattern in this article.
The Saga pattern
In order to manage business transactions across multiple microservices, the Saga pattern was introduced. Basically it is a series of local transactions; every transaction happens within the boundary of the micro-service, which every service will publish an event after the transaction for the next subsequent micro-service to perform the next transaction consuming the published event. This process will continue till the last transaction. In case any transaction failed in this series Saga will execute a series of fallback actions to undo the impact of all previous transactions.
There are two approaches to implementing the Saga pattern.
-
Choreography - The micro-service is responsible for emitting events eventually of its local transaction. The published event will trigger the execution of local transactions in microservices subscribed to the event. Also in this approach micro-service is responsible for handling the errors.
-
Orchestration - A central orchestrator(a stateful coordinator) will trigger the local transactions in services and will maintain the global transaction status including handling errors.
Now that we have a basic understanding of Saga pattern, we will discuss how to implement Saga pattern, defining an example for both approaches using Google Cloud Serverless model.
The real world example
Let’s consider a train ticket booking system.
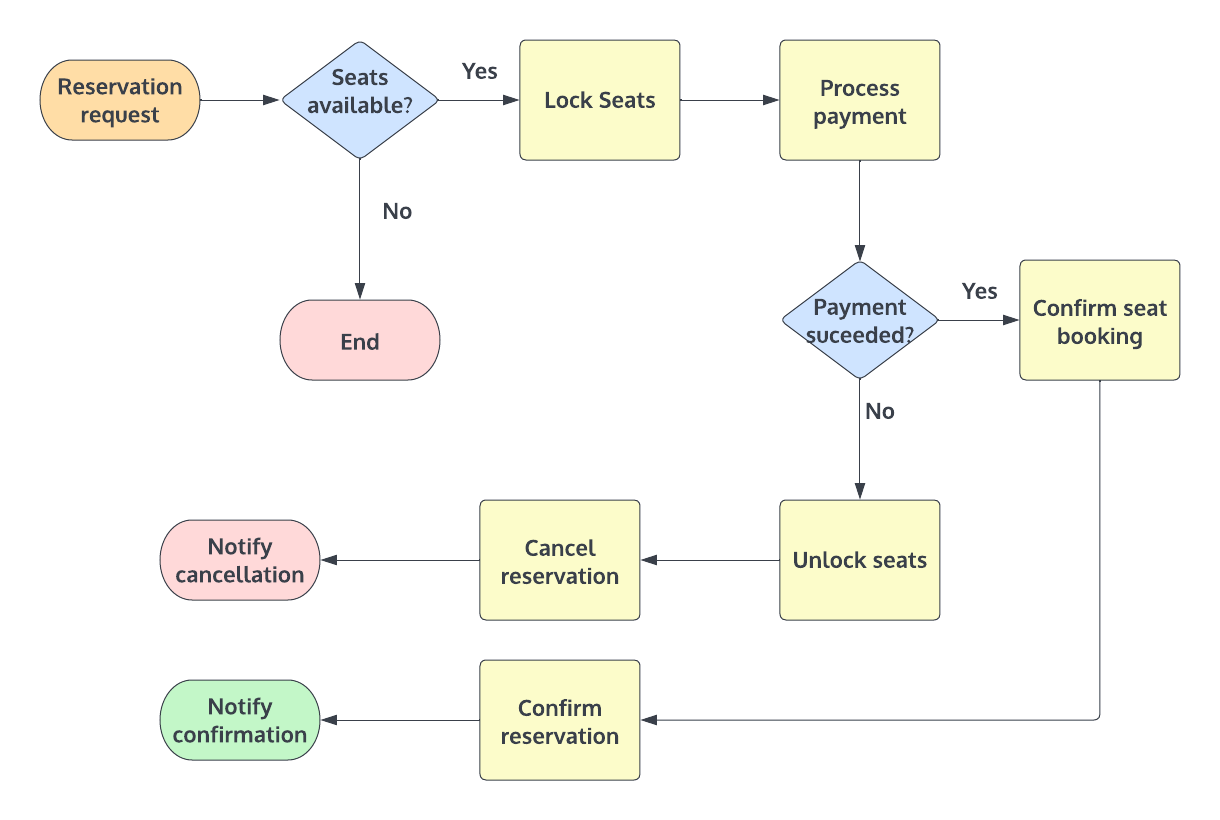
The workflow consists of,
- Send a seat reservation request
- Check for available transits in the database and proceed with seat booking.
- Hold the number of seats until payment is processed.
- Process the payment.
- Confirm the seat booking.
- Confirm the reservation and notify the customer.
However if the system encountered any error while running a local transaction, the fallback sequence should be executed to undo all the changes happening in the global transaction to keep the ACID properties.
Preparing the development environment
(Please note that we won’t be using a real payment gateway or a notification service, beacause the main purpose of this article is to demonstrate how to use severless model for Saga.)
To implement the solution we will be using Google Cloud serverless services, MongoDb and Javascript.
Before we begin we must have,
- A billing enabled Google Cloud project
- Prior knowledge in Google Cloud Services
- Python, NodeJs, GCloud cli tools installed in your system(If you are using Windows, WSL might come in handy)
Google Cloud CLI/Cloud console
You can use both CLI tools or web console to create and modify services. In this article we will be mostly using CLI tools. Please follow https://cloud.google.com/sdk/docs/install to install the Google Cloud SDK. And once you installed the SDK run gcloud init command and follow instructions to configure credentials.
Building the Cloud functions project structure
To build the project structure and functions, we will be using gostep, a pythonic CLI tool that I created previously to manage implementations when there are a lot of cloud functions.
To use gostep you need to have Subversion CLI, Python version 3 and Pip package manager installed(Setup a virtual environment of your own preference). When you are ready, run the command, pip install gostep. For more information please refer, http://lahirus.com/gostep-intro. Also please make sure that you have enabled Cloud build APIs(https://console.cloud.google.com/apis/library/cloudbuild.googleapis.com).
Using gostep, let’s first create a Cloud Functions project.
mkdir SagaChoreography && cd SagaChoreography
gostep auth init reservationsservice       # Creates a service account credentials file
gostep base init reservations location asia-east2 version "0.1.0"   # Creates gostep project metadata files and directory structure.
Now we can have the project base. Let’s move ahead with implementing local transactions and services.
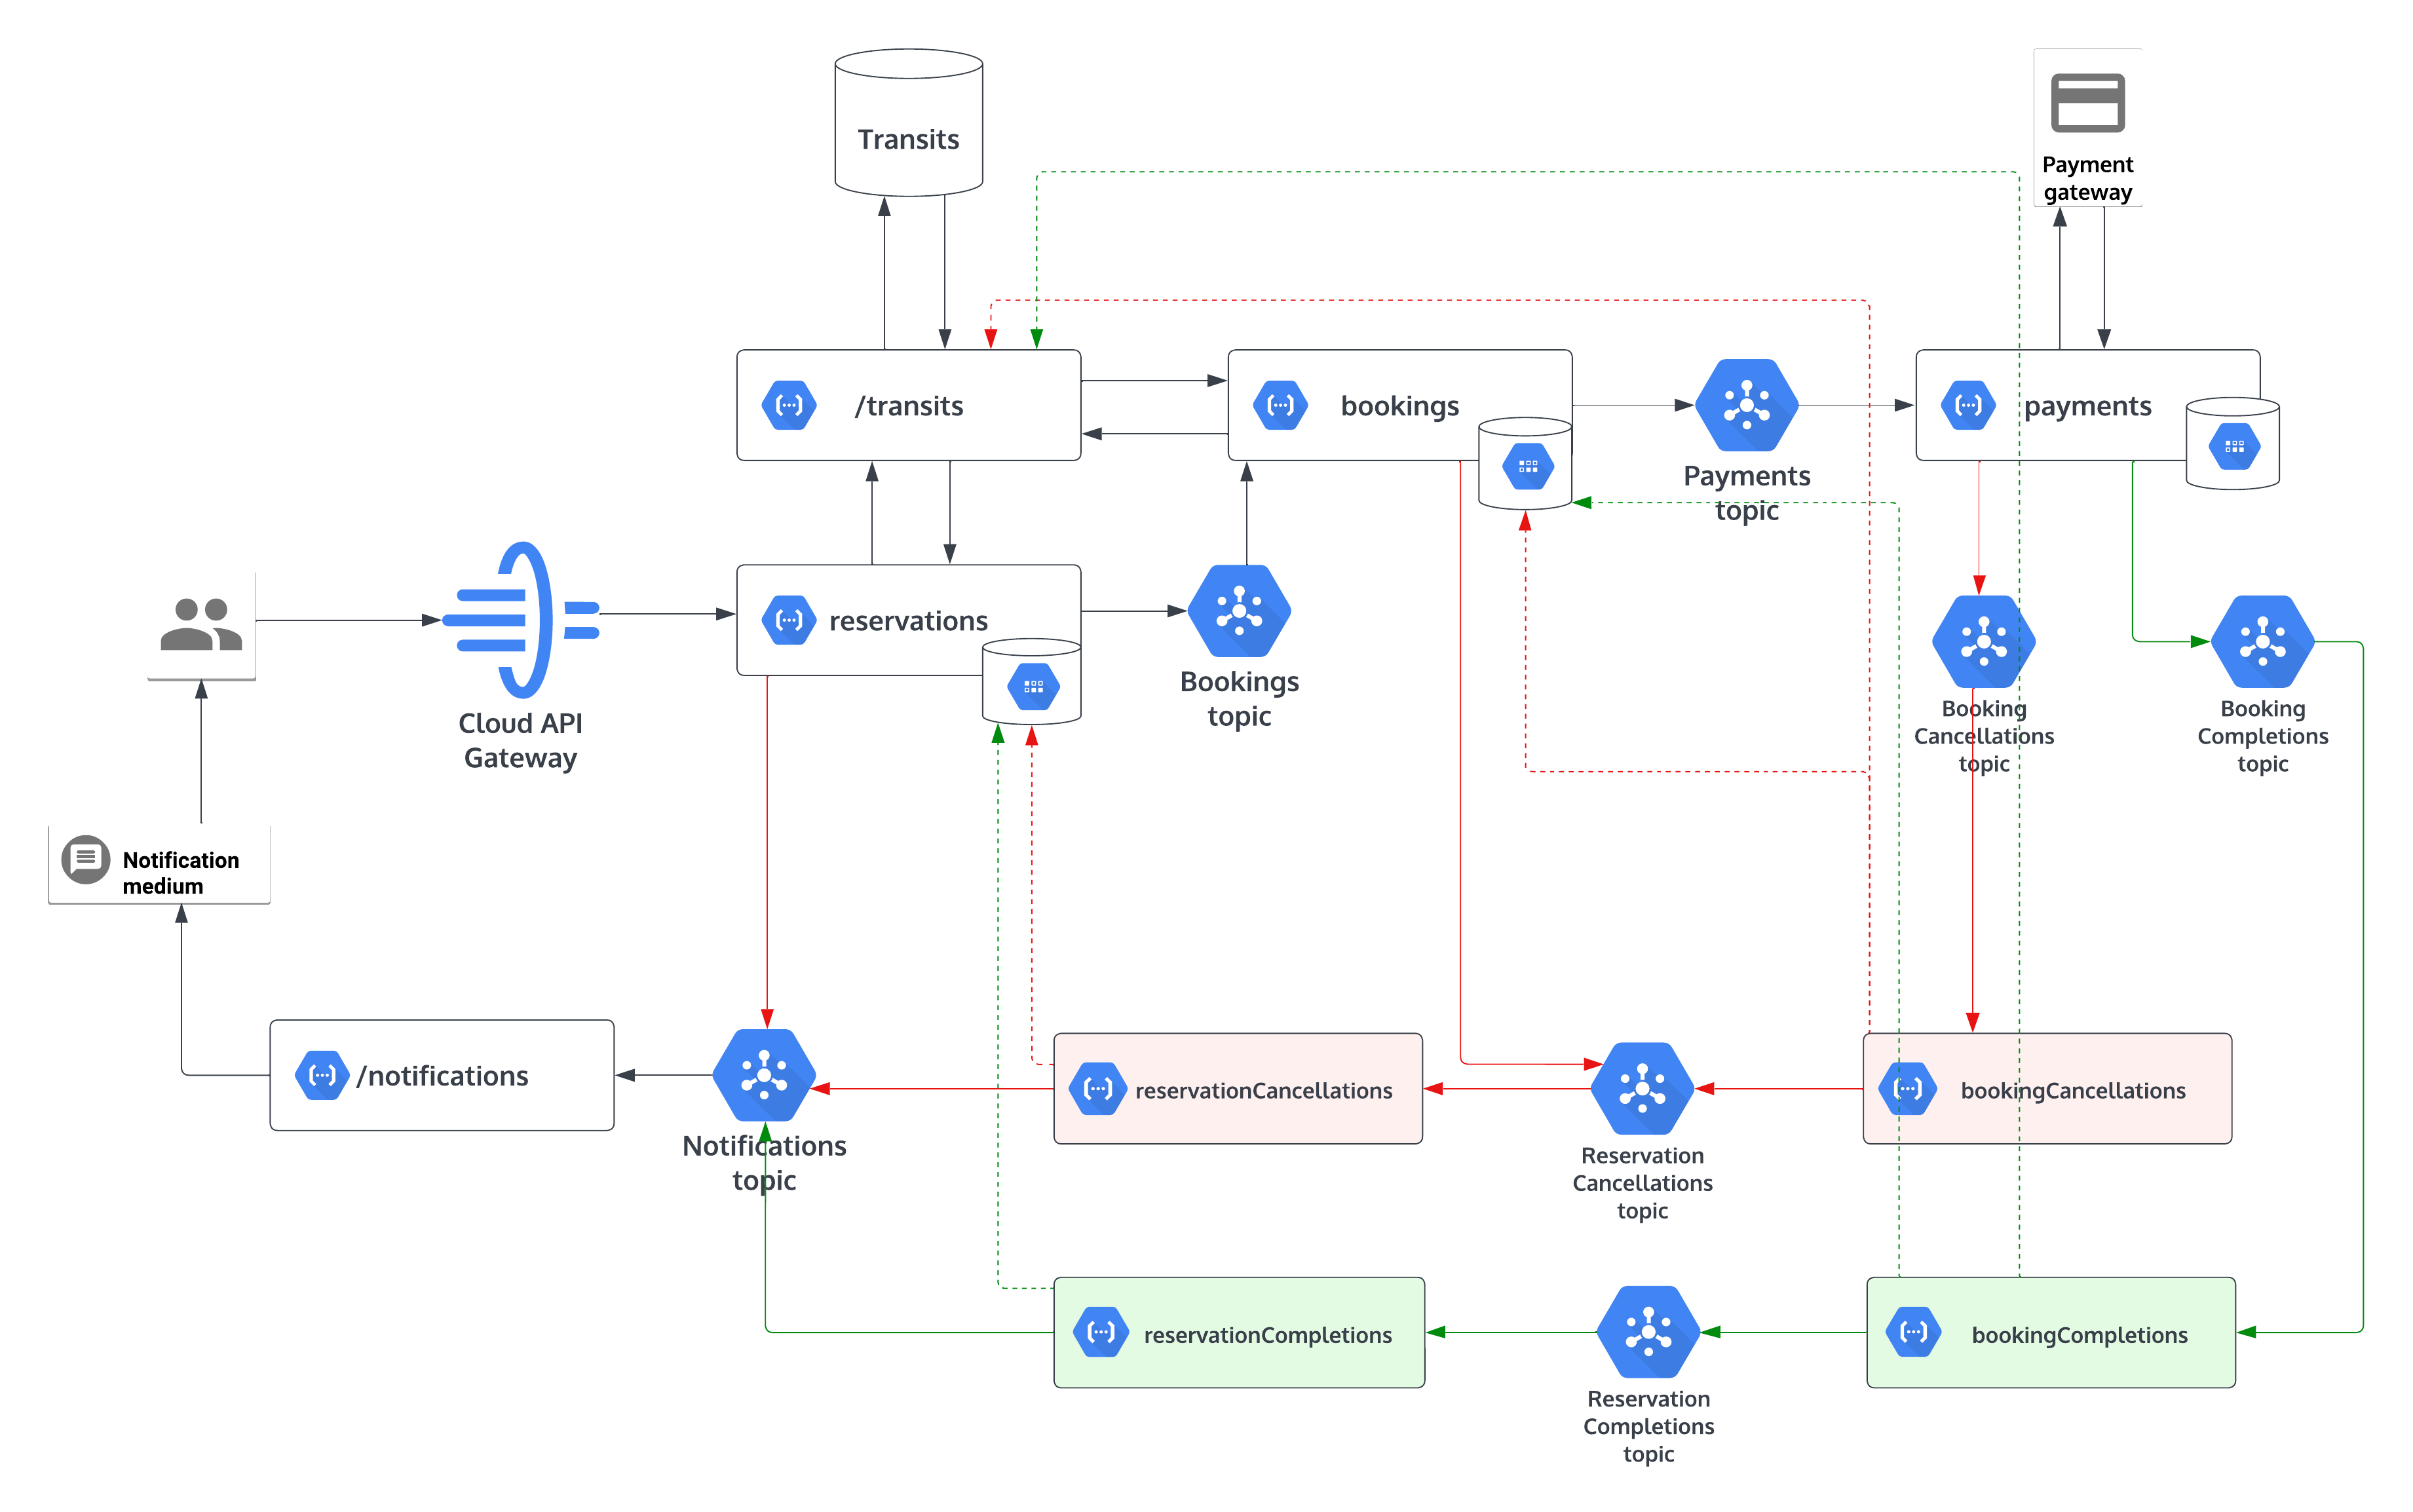
Choreography based solution
For the demonstration we will be using,
- Pub/Sub for event sharing
- Firestore to store event data
- MongoDb as the transits service database
Transits service
This micro-service is responsible for CRUD operations on train entities.
// Transit document schema
  {
       transitId: string,
       trainName: string,
       start: string,
       destination: string,
       day: string,
       departure: number,
       arrival: number,
       availableSeats: number,
       lockedSeats: number,
       totalSeats: number
  }
As the database, we will be using MongoDB Atlas pay as you go service in the GCP marketplace After configuring the MongoDb instance, let’s create the transits function.
gostep service init transits version "0.1.0" env nodejs
This will create a boilerplate NodeJs cloud function in {PROJECT_ROOT}/src/transits and it can be executed as a http request after the deployment.
Now let’s include the dependencies.
cd src/transits
npm install --save mongodb
After creating the transits database and the collection, we can add MongoDb connection URI and collection name in the src/trains/functions.json as an environment variable.
"environmentVariables": {
    "DB_URI": "mongodb+srv://<username>:<password>@<your-cluster-url>/<dbname>",
    "COLLECTION": "Transits"
    },
First let’s use these environment variables and create a function to connect to the database.
import { MongoClient } from "mongodb";


const DB_URI = process.env.DB_URI || "<Default DB con URI>";

const dbClient = new MongoClient(DB_URI);

const initDbClientConnection = async () => {
    try {
        await dbClient.connect();
    } catch(e) {
        console.error(e);
        throw new Error("Database failed to connect!");
    }
};
And now let’s write 2 functions to find transits documents and save/update documents.
const COLLECTION = process.env.COLLECTION || "Transits";

const query = async (queries) => {
    try {
        await initDbClientConnection();
        const transits = dbClient.db().collection(COLLECTION);
        return await transits.find(queries).toArray();
    } catch (e) {
        console.error(e);
        throw new Error("Failed to query transits!")
    } finally {
        await dbClient.close();
    }
}

const save = async(transitId, patches) => {
    try {
        await initDbClientConnection();
        const transits = dbClient.db().collection(COLLECTION);
        const targetData = { "$set": patches };
        await transits.updateOne({ transitId: transitId }, targetData, { upsert: true });
    } catch(e) {
        console.error(e);
        throw new Error("Failed to update transits!");
    } finally {
        await dbClient.close();
    }
}
In the main function we map GET and PUT https methods to above functions.
export const main = async (req, res) => {
    if(req.method === "GET") {
        res.json(await query(req.query));
    } else if(req.method === "PUT") {
        const transitId = req.query["transitId"];
        if(!transitId) {
            res.status(400).send({ "error": "Invalid parameters!" })
        }
        await save(transitId, req.body);
        res.status(201).send();
    } else {
        res.status(400).json({ "error": "Invalid request" });
    }
}
Great! Now we have our transits service. We can deploy it by running below command in the project root,
gostep deploy diff
After the deployment, transits service can be executed using http requests. But the endpoint is not available for the public. To test it locally, use the bearer token which you can obtain using the Gcloud cli.
gcloud auth print-identity-token
Reservations service
Next, we are going to implement the entrypoint of the global transaction. Like before, let’s bootstrap a cloud function again. Run,
gostep service init reservations version "0.1.0" env nodejs
Now we have our boilerplate code in {PROJECT_ROOT}/src/reservations.
Considering this scenario the reservations function is responsible for,
- Get the user request via a HTTP request.
- Call transits service and find out if there is any transit avaialable.
- If a transit is avialable publish an message to the relavent topic.
- Save the event data with it’s status as ‘IN_PROGRES’, to update later.
We are going to keep the event data stored in a database. So that we can keep the status of the particular event to use later. For that purpose we use Google Cloud firestore(data store in native mode), which is a serverless easy to use document database. To enable Firestore run,
gcloud firestore databases create --region=asia-southeast1
After that let’s install the dependencies. In the function root({PROJECT_ROOT}/src/resrevations) run,
npm install --save "@google-cloud/firestore" "@google-cloud/pubsub"
Let’s assume below payload as the request JSON.
{
    "day": "Monday",
    "start": "Colombo",
    "destination": "Ragama",
    "numberOfSeats": 10,
    "userId": "xyz@gmail.com"
}
Once the user made his request we have to obtain the available transits for the requested day, start position and destination of the transit. To do that we will using a HTTP request to the transits service we implemeted before. Since the transits APIs are not publically available we have to use the google-auth-library to authorize requests from other services(See more). There is no need to add the auth library as a dependecy since it is an already included library in the cloud function runtime.
First let’s add an environment variable for the transits API endpoint in {PROJECT_ROOT}/src/transits/function.json.
    "environmentVariables": {
        "TRANSITS_API": "{HOST_ADDRESS}/transits"
    }
After that let’s authorize our request to fetch available transits.
import { GoogleAuth } from "google-auth-library";


const TRANSITS_API = process.env.TRANSITS_API || "{DEFAULT_TRANSITS_HOST_ADDRESS}/transits";

export const getAvailableTransits = async (numberOfSeats, day, destination, start) => {
    try{
        // Create an authorized client to invoke restricted Transits API.
        const auth = new GoogleAuth();
        const transitsApiClient = await auth.getIdTokenClient(TRANSITS_API);

        const result = await transitsApiClient.request({
            url: `${TRANSITS_API}?day=${day}&destination=${destination}&start=${start}`,
            method: "GET"
        });
        return result.data.filter(element => element["availableSeats"] >= numberOfSeats);
    } catch(e) {
        console.error(e);
    }
};
Based on the result of the API request, we proceed further. Let’s assume that we got a list of available transits and we selected the topmost transit. Now we will be saving the event data in firestore, with a unique Id(a generated UUID as correlationId) as the global transation Id to identify the local transactions group and the status of the current event. It will aid to identify the local transaction for later references.
Same as before we can add the firestore collection name(reffered as kind in firestore) of the event as an environment varibale in {PROJECT_ROOT}/src/transits/function.json.
    "environmentVariables": {
        "EVENT_DATA_COLLECTION": "reservations"
    }
Now we can write our function to save event data in firestore. Please note that you don’t have to include configurations to authorize the connection to the firestore since the cloud function runtime has the authorized access to the firestore in the same project.
import Firestore from "@google-cloud/firestore";


const EVENT_DATA_COLLECTION = process.env.EVENT_DATA_COLLECTION || "reservations";

export const saveEvent = async (id, eventData) => {
    try {
        const firestore = new Firestore();
        const docRef = firestore.collection(EVENT_DATA_COLLECTION).doc(id);
        await docRef.set(eventData, { merge: true });
        const result = await docRef.get()
        return result.exists? result.data(): {}; // return the updated doc for later references
    } catch(e) {
        console.error(e);
        throw new Error("Error saving event data!");
    }
};
And since we have assumed that we have an available transit, we are going to publish a message to a pubsub topic to trigger the next event, bookings. First let’s create a topic for this purpose.
gcloud pubsub topics create reservations.bookings
And please copy the output of that command and keep it saved, we are going to need it later. Same as before let’s have another environment varible for the topic name and wirte the function to publish the message. In the message we include correlationId, numberOfSeats, transitId and userId.
import { PubSub } from "@google-cloud/pubsub";


const BOOKINGS_TOPIC = process.env.BOOKINGS_TOPIC || "reservations.bookings";

export const publishMessage = async (topic, message) => {
    try {
        const pubsubClient = new PubSub();
        const dataBuffer = Buffer.from(JSON.stringify(message));
        return await pubsubClient.topic(topic)
            .publishMessage({ data: dataBuffer });
    } catch (e) {
        console.error(e);
        throw new Error(`Error publishing message to ${topic}!`);
    }
}
Now we have all helper functions and we can write the logic in the main funtion. Once the function is complted to deploy run,
gostep deploy diff
Bookings service
The bookings function is responsible for hold the requested number of seats in selected transit until the global transaction is finished. The acting trigger of the function will be the reservations.bookings pubsub topic we create during the previous step. Once this service successfully locked the request number of seats it will publish a message to the relevenat pubsub topic to trigger the payments function.
Let’s start. To initialize the function run,
gostep service init bookings version "0.1.0" env nodejs trigger pubsub
Now we have bootstrapped our cloud function in {PROJECT_ROOT/src/bookings. Let’s tell the funtion that it will triggered by the reservations.bookings topic. For that we can include the resource value we copied from the previous topic creation in the {PROJECT_ROOT/src/bookings/function.json.
    "eventTrigger": {
        "eventType": "providers/cloud.pubsub/eventTypes/topic.publish",
        "resource": "projects/{GCLOUD_PROJECT_ID}/topics/reservations.bookings"
    }
Same as the reservations function, we need to save the local transaction’s event data with the correlationId and the status as IN_PROGRESS for later references. Also we can use same functions from the previous service to authorize requests to transits service and to publish the message to the next topic. What we can do is update the transit document to lock the requested number of seats.
import { GoogleAuth } from "google-auth-library";


const TRANSITS_API = process.env.TRANSITS_API || "{TRANSITS_API_HOST}/transits";

export const getTransitsById = async (transitId, client) => {
    try {
        const result = await client.request({
            method: 'GET',
            url: `${TRANSITS_API}?transitId=${transitId}`
        });
        return result.length > 0? result[0]: {};
    } catch (e) {
        console.error(e);
        throw new Error(`Error fetching transit data: ${transitId}`);
    }
};

export const updateTransitsById = async (id, newData, client) => {
    try{
        return await client.request({
            method: "PUT",
            url: `${TRANSITS_API}?transitId=${id}`,
            body: newData
        });
    } catch(e) {
        console.error(e);
    }
};


export const main = async (eventData) => {
    const transactionData = JSON.parse(atob(eventData.data)); // Extract data from pubsub message

    const correlationId = transactionData["correlationId"];
    const numberOfSeats = Number(transactionData["numberOfSeats"]);
    const transitId = transactionData["transitId"];
    const userId = transactionData["userId"];

    const auth = new GoogleAuth();
    const transitsApiClient = await auth.getIdTokenClient(TRANSITS_API);

    const transit = await getTransitsById(transitId, transitsApiClient);
    await updateTransitsById(transitId, {
                "lockedSeats": transit["lockedSeats"] + numberOfSeats,
                "availableSeats": transit["availableSeats"] - numberOfSeats
                }, transitsApiClient);
}
And like before we will be creating the next pubsub topic to publish the message from bookings.
gcloud pubsub topics create reservations.payments
After a successful seat locking, we will be publishing a message with correlationId, numberOfClients and userId.
Once the function has been completed we can deploy it using,
gostep deploy diff
Great! Now we have covered common functionalities,
- Consume HTTP requests
- Function to function direct communication(via HTTP)
- Read and update event data in firestore
- Publishing and subscribing to Pubsub topics
This is more than enough for us to implement next services. Therefor afterwards, I will be explaining the function’s role only.
Payments service
The payments service will consume the message from reservations.payments and publish a message to reservations.bookingCompletions or reservations.bookingCancelletions accordingly for a successful payment or for a failed payment.
Booking completions service
The booking completions will be consuming the messages from reservations.bookingCompletions topic, will be update the transit as the seat booking is completed and after that will update previously saved booking event’s status from IN_PROGRESS to COMPLETED for the relevant correlationId. Then the service will publish an message to the reservations.reservationCompletions topic.
Booking cancellations service
In the event of a payment failure, after consuming the message from the topic reservations.bookingCancelletions this function will rollback the locked seats in the relevant transit, will update booking event’s status from IN_PROGRESS to FAILED for the relevant correlationId and will pass the correlationId to the reservations.reservationCancellations topic.
Reservation completions service
As the final step of a completed series of events the reservation completions service will consume the correlation id for the transaction from reservations.reservationCompletions and will update previously saved reservations event’s status from IN_PROGRESS to COMPLETED. After that a message will be published to the reservations.notifications topic to send the successful transaction notifications to the customer.
Reservation cancellations service
Consuming the message from reservations.reservationCancellations this function will update previously saved reservations event’s status from IN_PROGRESS to FAILED and will publish a message to the reservations.notifications topic to send the failed transaction notifications status to the customer.
Securing the entrypoint
After deploying all the services we can use Google API gateway to secure our reservations entrypoint of the transaction.
Please refer API gatewey quickstart.
🦖 Let’s look into Orchestration based solution in the next article.
Super charge a Google cloud functions project
When developing a microservices project with cloud functions, managing the cluster of functions all of them together can be a pain in the ass. That is why I thought of developing a simple cli tool to super charge the development and deployment process.
I named this little Pythonic tool as gostep a.k.a serverless templates provider for Google cloud platform. However this tool is still taking the baby steps. Hope to develop this to be more useful in future releases.
I would like to show you how it works up to now.
First of all…
You need to have installed below components to use gostep cli.
- Python version 3.x with PyPI a.k.a pip(https://www.python.org/download/releases/3.0/, https://pypi.org/project/pip/)
- Gcloud sdk(https://cloud.google.com/sdk)
- subversion(https://subversion.apache.org)
- gostep(https://github.com/gostep-cli/gostep)
Next steps…
Now simply install gostep cli.
pip install gostep
After installing gostep, using gcloud sdk log in to your google cloud platform account.
gcloud auth login
Once you logged in, select the gcloud project that you want to use for your serverless functions.
gcloud config set project {projectId}
Oh! wait, to list down project Ids gcloud projects list or gostep gcloud projects can be used.
All set…
Now we are ready build a cloud functions cluster.
First gostep needs a workspace directory, a gcloud service account and a credentials file for deployment purposes.
We can initiate them by this command, gostep auth init {new_service_account_name} inside {workspace_directory}.
gostep auth init my-service-account inside ./my-workspace
Now we can see a credentials file has been generated inside the workspace.
Next we need to create a configuration file which keeps the project skeleton. We need to chose a default region for that. Otherwise gostep will choose that for us. To get a list for our gcloud project gostep gcloud locations can be used. Now we can simply do,
gostep base init {project_name} location{gcloud_region_id} version "0.1.0" explains {description} inside {workspace_directory}
In our case,
cd my-workspace
gostep base init my-new-project location asia-east2 version "0.1.0" explains "my sample project"
It’s geen light now to create cloud functions now. gostep has specified template structures for this. Let’s simply bootstrap a python cloud function. For this purpose,
gostep service init {cloud_function_name} location {gcloud_region_id} version {service_version} env {runtime} explains {desciption} inside {workspace_directory}
Since we are in the workspace directory and we already set up a default location Id we won’t be using location and inside arguments.
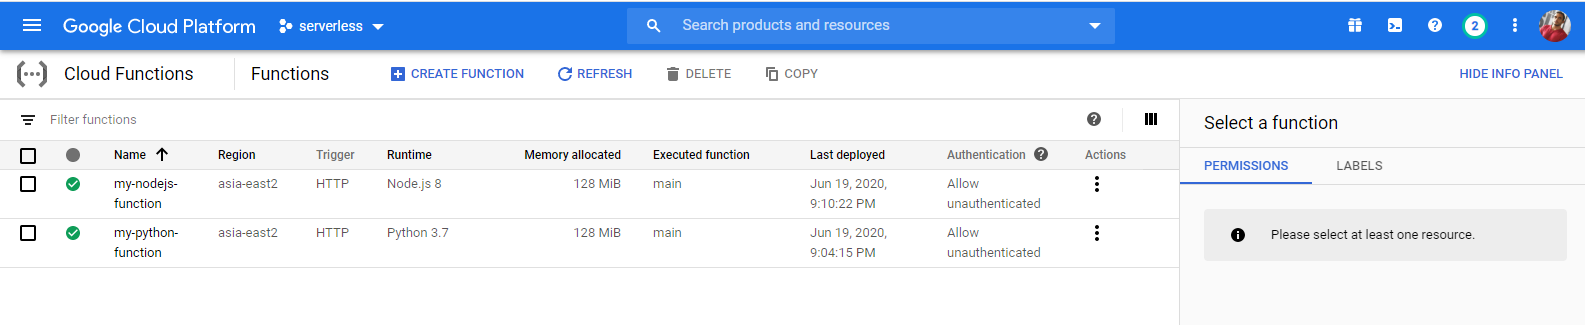
gostep service init my-python-function version "0.1.0" env python
Let’s bootstrap another function with nodeJs.
gostep service init my-nodejs-function version "0.1.0" env nodejs
We can see source files inside the {workspace_directory}/src. In our case inside, my-workspace/src/my-nodejs-function and my-workspace/src/my-python-function.
Great…!
Now our project is ready to get deployed. Aight… Let’s do,
gostep deploy diff
diff keyword will only deploy the changes we made for our functions(gostep tracks md5 of the function directory). To deploy a single function it needs to be called by name. gostep deploy {function_name}. In our case,
gostep deploy my-nodejs-function
Bravo…!
Now our functions are deployed and ready to be executed.
In future releases…
- More templates, templates for go lang, templates for Spring framework, etc…
- Handle function triggers such as pubsub, events, etc…
- Run cloud functions cluster in local environment, so developers can benefit debugging.
Please find the source code in https://github.com/gostep-cli/gostep.
Application Deployment in Apache Tomcat on GCE Using Ansible
Think about a person who needs a cloud instance temporarily to deploy a web application to do tests frequently and throughout the time he deploys the application, use it for a while and then deletes the instance to save the cost. Or someone needs to create a cluster, thus he needs to instantiate several cloud servers at once, install dependencies and deploy the application on each server. Doing these tasks by hand costs much effort and it is inefficient. The way to make such scenarios easier, efficient and effective is making a reusable structure which does these repetitive tasks when we invoke it. For that purpose, we use configuration management.
Setting up Creative Labs USB DAC volume knob on Linux
Lately I bought a Creative Labs SB1095, a 5.1 USB DAC for my laptop. This USB sound card works perfectly on Linux. The sound quality is better than the integrated, but it has a volume knob on it and a remote controller, which does not support out of the box by Linux distributions which I have tried(Ubuntu, Linux Mint, OpenSuse, Arch Linux). After digging up the internet a little bit I perceived that it is required to configure a software volume controller to handle the volume knob. However, I did not want to go for that kind of advanced configurations, and finally found an easy workaround for this purpose. Would like to take down the steps, so it might help others which have the same issue.
Continuous Code Quality On My OpenSource Project
Good quality in code plays an essential role when it comes to software, thus it assets efficiency, reliability, robustness, portability, maintainability and readability like essential factors. Considering a GitHub project, there are plenty of options to measure code quality. Considering options I would like to chose SonarQube for this particular purpose. Let me take down the steps, how I used SonarQube to measure code quality using a Java project, one of my GitHub hosted projects, Depli.
Continuous listening to remote text files using python
Log Tracker is a simple wrapper around Python paramiko to track text files using SSH.
It gives you the ability to create custom python functions to track and analyze log files the way you want.
A user can access the contents in multiple log files at the same time also.
Using a custom function a user can display a log content in a web interface using Flask like lightweight web service,
so then anyone can analyze contents easily, without wasting time to login into servers and download contents.
For more information please refer below links.
Depli - A JVM monitor application
Depli provides you the 10-second solution for monitoring JVMs. Just add a JMX remote connection using webUI and see how it works. Depli provides you a rich UI, you can even search for running threads, classpaths etc. This handsome tool has been released under GPL license on GitHub.
JVM CPU usage using Java MXBeans
This is a solution to a problem, occurred to me while developing Depli a JVM monitoring dashboard which uses JMX remote connections. There is no way to get the JVM CPU usage directly using MXBeans in JDKs older than version 7. For my application I wanted a universal method. Finally, I got it working thanks to source code of jconsole.
Savior ship - A cross flatform C++ game
Savior Ship is a simple 2D shooter game implemented using C++ and simple direct media layer version 2(SDL2), This is the way I attempted to refresh my skills on C++. Savior ship has been released under GPL license in GitHub for the purpose of helping out the people who seek SDL2 beginner level applications to learn.
Surgeon Tux - A Jekyll template
Surgeon Tux is a GPL(v3) licensed free Jekyll template meant for terminal lovers. I tried my best to give it the appearance of a terminal.
Traverse through font design timeline
KalaGola is a cross platform Pythonic tool to traverse through the timeline of your GitHub hosted font repository,
and generate a video file to show how your font evolved through time. Just provide your custom web template and
repository information as a YAML file or as command line arguments, KalaGola will serve you your video.